| Author |
Message |
Jan6K

Joined: 04/12/2002
Posts: 4741
Karma: +107 / -0 
Location: Hagen
Premium Support
|
 20-11-2003, 18:30 Subject: Ibiza 6K: LDA & Oil Temp - Photos & Guide |
Quote |
|
Hello everyone,
You've probably seen a little bit about what I've been working on over the past week, namely a combined LDA (Laser Doppler Anemometer), voltmeter, and oil temperature display – and I promised to share some photos.
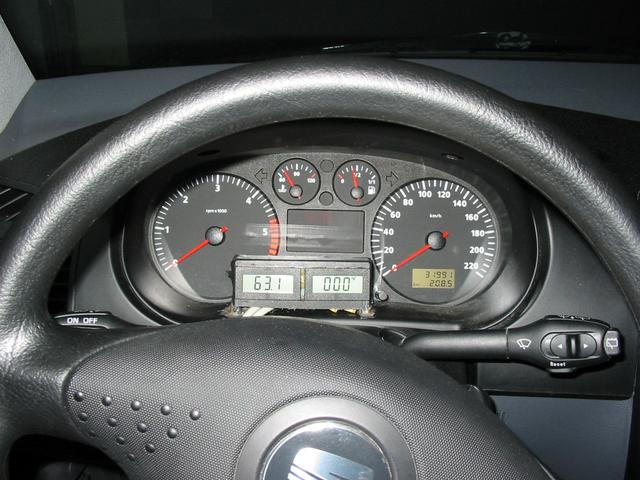
Here are a few snapshots, though they were taken in the dark. But today, after many problems (mainly with connectors from Conrad), was the day when everything finally worked for the first time, and now only some minor adjustments are needed.
Okay, here's the translation:
"I'll add short comments below, directly to the images. Here's a brief note about the technical aspects:"
LDA:
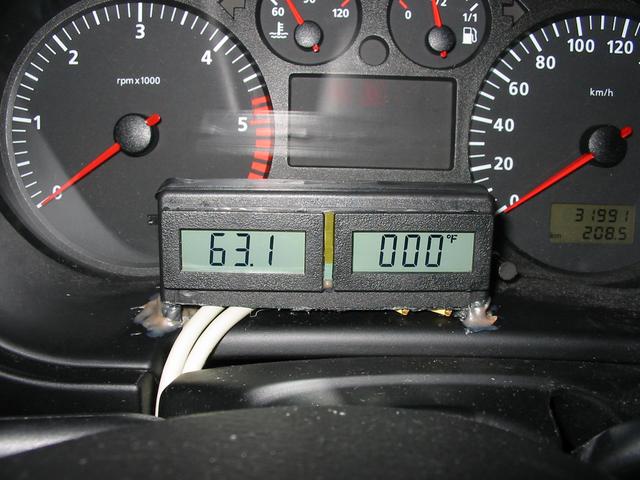
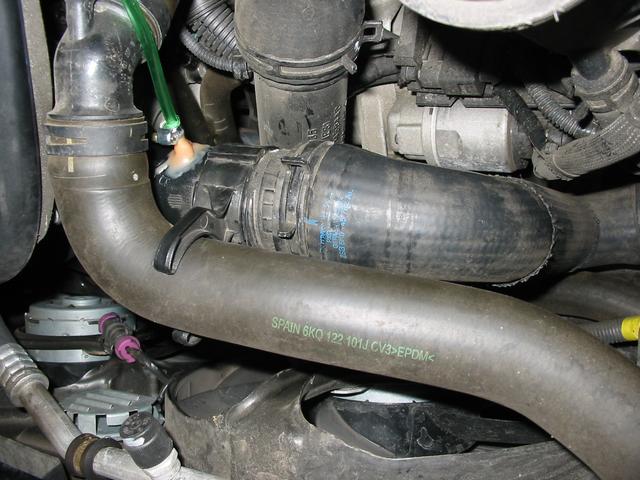
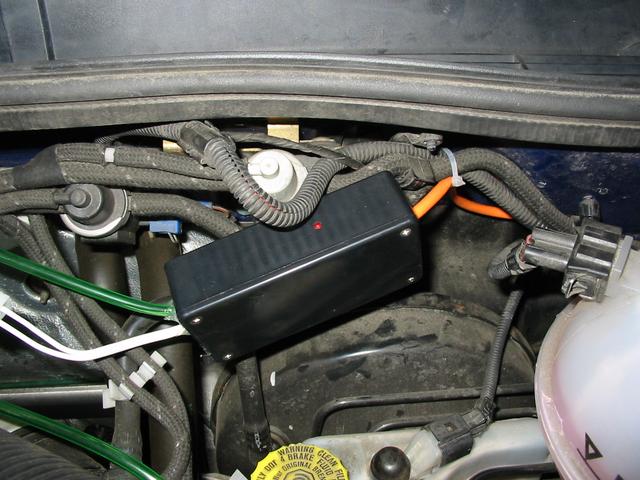
The sensor is an MPX4250AP (located in the black box above the green tube) and operates on a voltage divider, to which the positive input of the right-hand panel meter is connected. The negative input is connected to another voltage divider against +5 volts for zero-point correction. The display shows the value in millibars, and it can be calibrated using the two potentiometers.
I intentionally avoided tapping into the original sensor to achieve redundancy and to avoid making any modifications to the control system.
Voltmeter:
Quite simply, it's connected to the positive lead via a bridge circuit, and there's a relay on the left multimeter that can be switched between voltage and oil temperature readings.
Oil temperature:
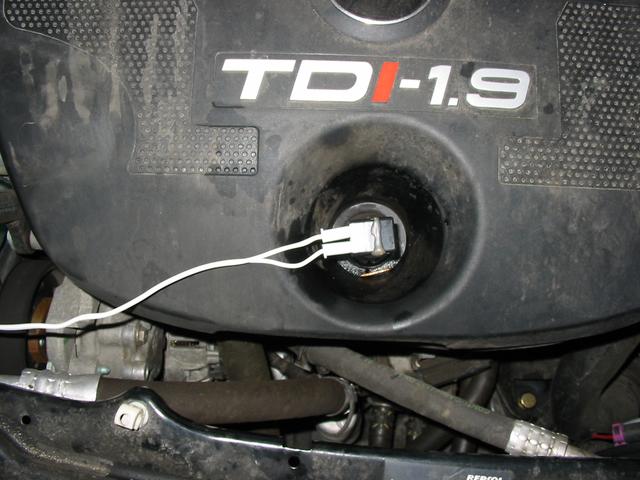
I've already mentioned something about the probe sensor in the other thread ("Sensorik fuer Oeltemperatur"). The evaluation circuit uses a constant current source with an LM317, followed by a relay that connects to the panel meter. Zero adjustment is done via a potentiometer. A second relay, also connected to the switch, handles the switching of the decimal points.
LEDs:
Originally, the LEDs were intended for preheating, glow plug heater I and II, and a "free" function. However, since my car doesn't have glow plug heaters, I've connected all three yellow LEDs to the preheating function. Since I already had to access the light switch due to the red (panel meter modification) illumination and its regulation, I've now connected the fourth (green) LED to the fog lights, which otherwise don't provide any reasonable feedback on the Ibiza.
Architecture:
The whole thing consists of the following components:
Ad blocker - clear.
Electronics module - voltage supply, switching, voltage divider for oil temperature and voltage, and a consolidation of all the wiring (this unit has 18 connections) - located under the instrument panel.
Sensor block - contains the MPX4250AP and the connectors for the probe.
Dipstick - clear.
That's all for now... if there's interest, I can turn this into a technical article.
Regarding the pictures... the mounting of the display is still in the "alpha" stage, as I'm still working on a cover to go around the bottom that will hide the cables and adhesive points.
Best regards,
Jan.
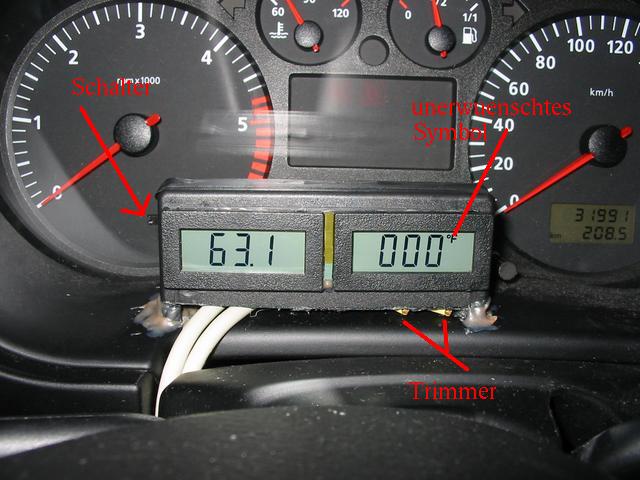
P.S.: Edit: The text that was too long in image 2 should continue something like this: On the right, the two trimmers of the LDA; on the left, the switch; and in the middle, the 4 LEDs.
| Description: |
| Blick auf das Gesamtwerk von etwas weiter weg - die Spieglungen in der Instrumentenabdeckung kommen vom Blitz. |
|
| File size: |
58.32 KB |
| Viewed: |
2481 times |
|
| Description: |
| Die Anzeige von dicht. Leider hat sich rechts (Ladedruck) durch verlaufenen Heisskleber das "F"-Symbol aktiviert, was ohne umfangreiche Demontagen nicht zu beheben geht - das loese ich also spaeter. Der Sockel wird noch verkleidet, ebenso die Kabel. Recht |
|
| File size: |
54.77 KB |
| Viewed: |
2484 times |
|
| Description: |
| Der Peilstabsensor im eingebauten Zustand - weitere Bilder gibts in dem oben erwaehnten anderen Thread. |
|
| File size: |
52.78 KB |
| Viewed: |
2452 times |
|
| Description: |
| Die Anzapfung des Ladedruckrohrs in unmittelbarer Naehe des Seriensensors (verdeckt durch Kuehlwasserschlauch). Die Klebung ist mit 2-Komponentenkleber gemacht, der "Stutzen" ein Schlauchverbinder aus dem Bauhaus. |
|
| File size: |
61.46 KB |
| Viewed: |
2902 times |
|
| Description: |
| Der Sensorblock mit dem gruenen Schlauch fuer den Drucksensor, dem orangen Kabel nach innen, und dem weissen Kabel zum Peilstab |
|
| File size: |
62.74 KB |
| Viewed: |
2566 times |
|
1Z5 CFHF  / AHB H4D 
Translated on 23-10-2026, 6:05.
|
|
| Back to top |
Profile PM |
 |
kapernaum
Guest
Free account, no CAN development support
|
| 20-11-2003, 19:52 Subject: Ibiza 6K: LDA & Oil Temp - Photos & Guide |
Quote |
|
Hello Jan!
Great job!
I have followed the story about the proximity sensor with interest, and I find your 'all-around happy' solution very well done  .
I've also been wanting to install at least one LDA (Laser Doppler Anemometer) on my G3 AHU (Air Handling Unit) for quite some time, but I'm not really a fan of the solutions that use analog instruments, because there isn't a suitable place to install them in the G3 that I like (excluding Ulf's solution, which is also excellent  ).
Unfortunately, I can't install it where the seat heater switches are (like Thomas does) because I have seat heaters.
I would be very happy to receive a technical article with a parts list, clear circuit diagrams, etc. !
Best regards,
Translated on 23-10-2026, 6:10.
|
|
| Back to top |
|
|
Jan6K
Joined: 04/12/2002
Posts: 4741
Karma: +107 / -0
Location: Hagen
Premium Support
|
| 20-11-2003, 20:25 Subject: Ibiza 6K: LDA & Oil Temp - Photos & Guide |
Quote |
|
Hi,
Thank you for your kind words!
I'll see when I can get something coherent written down – but it might take a few days.
The circuit diagram and parts list are actually quite simple (I'll post them anyway), but the real challenge was the mechanical assembly, as there's very little space in the display module.
I actually wanted an analog LDA, but I couldn't find a sufficiently small "mechanical" LDA, nor a small moving-coil instrument that could be integrated with sufficient accuracy.
"However, the digital device doesn't bother me anymore, because you can clearly see the overshoots on it (even though it still displays a slightly too high value, which I need to calibrate)."
Best regards,
Jan.
1Z5 CFHF / AHB H4D
Translated on 23-10-2026, 6:12.
|
|
| Back to top |
Profile PM |
|
kapernaum
Guest
Free account, no CAN development support
|
| 20-11-2003, 20:35 Subject: Ibiza 6K: LDA & Oil Temp - Photos & Guide |
Quote |
|
Yes, that was exactly the problem I was having too... The standard LDAs are too large, and Ulf's are quite specialized.
How often are the measurements taken per second in your LDA (Laser Doppler Anemometry) system? Is that frequency sufficient to accurately detect and identify overshoots?
Regards,
Capernaum.
Translated on 23-10-2026, 6:13.
|
|
| Back to top |
|
|
Jan6K
Joined: 04/12/2002
Posts: 4741
Karma: +107 / -0
Location: Hagen
Premium Support
|
| 20-11-2003, 20:41 Subject: Ibiza 6K: LDA & Oil Temp - Photos & Guide |
Quote |
|
Hi,
According to the panel meter's description, it occurs approximately three times per second. As mentioned, overshoots are easily recognizable.
Currently, I'm getting peak pressures around 1.3 bar, with a target value of 1.08 bar. However, it's not fully calibrated yet, and I probably need to adjust it a bit lower (I'll do this based on the readings from VAGCOM, which will give me at least a reference point).
Best regards,
Jan.
1Z5 CFHF / AHB H4D
Translated on 23-10-2026, 6:14.
|
|
| Back to top |
Profile PM |
|
ulf
Profi-Schrauber

Joined: 04/13/2002
Posts: 11058
Karma: +18 / -0
Location: Saarland
2023 MG ZS
Premium Support
|
| 20-11-2003, 20:49 Subject: Ibiza 6K: LDA & Oil Temp - Photos & Guide |
Quote |
|
Hi Jan,
A lovely story.
A final photo showing the finished look would be interesting.
However, I can't see the TDA trimmers or the Volt/Degree switch anywhere in the pictures   .
Quote: | | Currently, I'm getting peak pressures around 1.3 bar, and a target value of around 1.08 bar. | However, it's not 100% calibrated yet, and I probably need to adjust it a little lower (I'll do this based on the values from VAGCOM, which will at least give me a reference point). 
If you want to be extremely precise: Buy approximately 12 meters of thin aquarium tubing or something similar and hang it in the stairwell (which, of course, must be higher than 10 meters).
Hang a bucket of water at the top, and use a pump to suck the water up from the basement.
If it starts to spray out, bend the hose, connect it to the LDA, and then release the bend.
Here's how you can create highly accurate "relative pressure readings" (measured as the vertical distance from the water level in the container, and a measuring tape or similar tool is very helpful for this). If you raise the LDA by 1 meter, it should display a pressure of 0.9 bar, and so on.
After that, you can even check the pressure sensor in the engine computer for errors, instead of using it as a reference }. Gruß Ulf
_________
MG4 Electric
Translated on 23-10-2026, 6:16.
|
|
| Back to top |
Profile PM Garage |
|
Jan6K
Joined: 04/12/2002
Posts: 4741
Karma: +107 / -0
Location: Hagen
Premium Support
|
| 20-11-2003, 22:18 Subject: Ibiza 6K: LDA & Oil Temp - Photos & Guide |
Quote |
|
Hi Ulf,
"I still need to find some time to finalize the appearance, but it will probably just be a cover. In the meantime, I'll be testing it thoroughly so I don't have to take it apart again."
I have marked the trimmer and the switch in the picture below for you .
The trimmers are those spindle trimmers from Conrad, which are 10x10x5 mm in size and have the "drive" on one corner. By installing them at a somewhat diagonal angle (and using hot glue), I've managed to make it so you can still access them from the front, as long as there's no cover in front.
I initially performed the calculation (the curve from the MPX4250AP is quite precisely defined, but the deviations also allow for some leeway), and then verified it using a large syringe (i.e., by measuring the volume change, taking the hose into account, and trying to simultaneously monitor the display while generating 1 bar of pressure).
"The advantage of the digital display is that I can adjust it reproducibly. I have two trimmers: one sets the zero-point offset, and the other controls the gain. When I set the zero point to 0, the display shows 940, which corresponds exactly to the value the sensor outputs at a pressure of one bar above its zero point (it doesn't start exactly at 0 bar, but rather at 80 mbar, which is exactly the difference between 1020 and 940)."
Starting from that value (which is already quite accurate), I can successively derive smaller values from it, or even restore older values, and then readjust the zero point.
I probably now have the most accurate version using this method. I will just recalculate the minimum and maximum values of the tolerance curve from the datasheet to see the error range that results from it.
"Eichen" (calibrating) the engine computer locks in the current "as-is" state, but that's not necessarily a bad thing, because later errors are still detectable, even if the reading was slightly off, perhaps 1.05 bar instead of 1 bar.
Ultimately, I probably combine both, the calculation and the experiment – the calculation as a framework, and the experiment to find the optimal point within that framework.
The idea with the water is certainly a nice one, but it's also quite complicated ).
Best regards,
Jan.
| Description: |
|
| File size: |
50.95 KB |
| Viewed: |
2336 times |
|
1Z5 CFHF / AHB H4D
Translated on 23-10-2026, 6:20.
|
|
| Back to top |
Profile PM |
|
DocSnydor
Guest
Free account, no CAN development support
|
| 21-11-2003, 12:40 Subject: Ibiza 6K: LDA & Oil Temp - Photos & Guide |
Quote |
|
Great idea, Jan! I'm not a huge fan of the installation location, though... (it's not my car, after all...)
What I actually wanted to ask is: In the pictures, I can see that you used a regular plastic hose for the boost pressure. Is that safe?
When I installed my LDA, I searched for a very long time until I found a rubber hose with fabric covering (like the original). At VW, they want about 10 euros per meter . I finally found it at a hydraulics service company, where they sold the hose for 3 euros...
Translated on 23-10-2026, 6:24.
|
|
| Back to top |
|
|
Arne
Guest
Free account, no CAN development support
|
| 21-11-2003, 13:43 Subject: Ibiza 6K: LDA & Oil Temp - Photos & Guide |
Quote |
|
Hi Doc,
I also used regular plastic tubing for my LDA (Lambda-Sonde/Oxygen Sensor) in my Corrado back then.
Why should that be a cause for concern? He needs to be able to handle the pressure and mustn't...
Disassembles upon contact with oil.
Regards,
arne
Translated on 23-10-2026, 6:25.
|
|
| Back to top |
|
|
SeatLeon
Guest
Free account, no CAN development support
|
| 21-11-2003, 14:10 Subject: Ibiza 6K: LDA & Oil Temp - Photos & Guide |
Quote |
|
I also used a standard aquarium hose. What I don't like about it is that it becomes quite soft and elastic at the temperatures in the engine compartment. According to the product description, it should withstand up to +60 degrees Celsius. I suspect that the temperatures in the engine compartment, especially in the summer, might exceed 60 degrees.
Translated on 23-10-2026, 6:26.
|
|
| Back to top |
|
|
Jan6K
Joined: 04/12/2002
Posts: 4741
Karma: +107 / -0
Location: Hagen
Premium Support
|
| 21-11-2003, 14:20 Subject: Ibiza 6K: LDA & Oil Temp - Photos & Guide |
Quote |
|
Hi,
So, that green thing is actually an aquarium hose. It was much more stable than the other plastic hoses at the hardware store, and also quite inexpensive ).
I'll see if it works in the summer; if not, I'll replace it. It's not a big deal, because it doesn't leave the engine compartment, and the conversion to electric already happens up front .
@DocSnyder: Why don't you like the location? The indicator doesn't obstruct anything there. Behind it is just the area where German Ibises display the "P" for parking (mine doesn't, though, as it's located higher up on the control LEDs), and I don't need the tachometer for speeds above 5000 either...
It looks fantastic, and the red color of the lighting is exactly the same as the original instruments. In the dark, you can't even tell that the trim pieces are still missing – it looks like it's supposed to be like that.
Best regards,
Jan. 1Z5 CFHF / AHB H4D
Translated on 23-10-2026, 6:27.
|
|
| Back to top |
Profile PM |
|
ulf
Profi-Schrauber
Joined: 04/13/2002
Posts: 11058
Karma: +18 / -0
Location: Saarland
2023 MG ZS
Premium Support
|
| 21-11-2003, 18:43 Subject: Ibiza 6K: LDA & Oil Temp - Photos & Guide |
Quote |
|
Jan6K wrote: | Hi Ulf,
I have marked the trimmer and the switch in the picture below for you .
The trimmers are spindle trimmers like these . . . |
Hi Jan,
Now it's becoming clear. I was looking for the standard trimmers with an approximate 270-degree rotation angle.
I thought those adjustment screws were for something related to the mounting, and I wasn't sure if that piece sticking out on the switch was supposed to be a piece of exposed insulation tape... Gruß Ulf
_________
MG4 Electric
Translated on 23-10-2026, 6:29.
|
|
| Back to top |
Profile PM Garage |
|
Jan6K
Joined: 04/12/2002
Posts: 4741
Karma: +107 / -0
Location: Hagen
Premium Support
|
| 21-11-2003, 19:05 Subject: Ibiza 6K: LDA & Oil Temp - Photos & Guide |
Quote |
|
Hi Ulf,
Loose electrical tape... tststss... *grins*
No, it's just a simple slide switch from Conrad that controls the two relays. The top position indicates voltage, and the bottom position indicates oil temperature.
With the 270-degree trimmers, I haven't had good experiences regarding adjustment accuracy, which is why I'm converting to spindle trimmers, which have an adjustment range of 25 revolutions .
I would advise everyone to be cautious about connectors based on these 6.3 mm plugs. They are quite cheap and available in self-assembly connector/socket housings, but they apparently are only designed for higher currents (where loose connections can weld together). I experienced massive intermittent contact issues with mine, even after soldering and careful work. I have now replaced them with screw terminals (which I will later replace with higher-quality connectors when I find some good ones), and everything has been working perfectly since then.
After the sensor tap modification today (it was the last one of that type), everything now works perfectly without any issues, and I had an oil temperature of 90 degrees Celsius after 10 km of city driving. I didn't drive any further ).
Best regards,
Jan. 1Z5 CFHF / AHB H4D
Translated on 23-10-2026, 6:31.
|
|
| Back to top |
Profile PM |
|
DocSnydor
Guest
Free account, no CAN development support
|
| 22-11-2003, 18:52 Subject: Ibiza 6K: LDA & Oil Temp - Photos & Guide |
Quote |
|
@DocSnyder: Why don't you like the location? The indicator doesn't obstruct anything there. Behind it is just the area where German Ibises display the 'P' for parking (mine doesn't, though, as it's located higher up on the control LEDs), and I don't need the tachometer for speeds above 5000 rpm either...
Sure, that's the best place, as it's easy to take a quick look. And nothing is hidden. I just meant that I personally don't like the aesthetic. Please don't be offended, but it seems a bit cheap to me. I don't want to criticize the idea or the implementation, because I actually think it's really great! I just find the display itself ugly, or it doesn't fit with the speedometer... I think it would look better on a 3 Series Golf or a 35i, as their instrument clusters use similar displays for kilometers or MFA.
So, Jan, don't be upset, but keep doing what you're doing, your ideas are great!
Translated on 23-10-2026, 6:34.
|
|
| Back to top |
|
|
Jan6K
Joined: 04/12/2002
Posts: 4741
Karma: +107 / -0
Location: Hagen
Premium Support
|
| 22-11-2003, 19:23 Subject: Ibiza 6K: LDA & Oil Temp - Photos & Guide |
Quote |
|
Hi,
@DocSnyder: Of course, I'm not angry with you. I don't think these Panemeter products are ideal, but they offer the best value for money, and they don't look that bad in real life.
I just hope I'll soon have the time to make the missing covers, because then the whole thing will look completely different.
Otherwise, I have now published the technical article online.
http://www.informatik.hu-berlin.de/~richling/auto/lda/
I will also integrate that into the article system here on the forum later this evening.
Best regards,
Jan. 1Z5 CFHF / AHB H4D
Translated on 23-10-2026, 6:35.
|
|
| Back to top |
Profile PM |
|
Jan6K
Joined: 04/12/2002
Posts: 4741
Karma: +107 / -0
Location: Hagen
Premium Support
|
| 11-01-2004, 14:07 Subject: Ibiza 6K: LDA & Oil Temp - Photos & Guide |
Quote |
|
Hi,
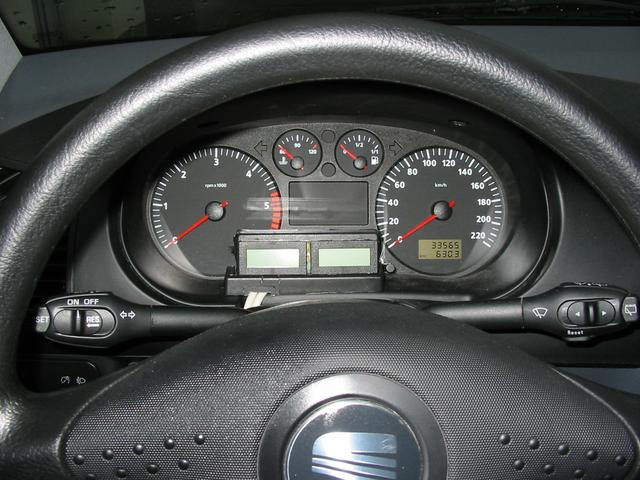
After working with the LDA for a long time, I finally managed to finish and assemble the cover today (see the picture below; this picture and two more new ones have now been included in the technical article, so it is now complete).
Best regards,
Jan.
| Description: |
| Ibiza 6K: LDA & Oil Temp - Photos & Guide |
|
| File size: |
61.18 KB |
| Viewed: |
1939 times |
|
1Z5 CFHF / AHB H4D
Translated on 23-10-2026, 6:36.
|
|
| Back to top |
Profile PM |
|
|


 Bookmarks
 Links
 Garage
 FAQ, Legal Notice & Privacy
 RSS Feed
 Register
 Login


