VCDS and OBD diagnostic device in the On-Board Diagnostics Shop
Diesel, Engine Technology and Vehicle Technology. Repair, Maintenance and Diagnostics (OBD).

TDI Injector Replacement: DIY Guide & Tips (Articles)

 
🔗 🖨 Dieselschrauber - Index » Troubleshooting & Guides
TDI Injector Replacement: DIY Guide & Tips
dieselschrauber Post10-08-2005, 20:35  
To replace the injectors on a TDI engine with a distributor injection pump (Audi, Seat, Skoda, VW), you will need the following tools:
  • Good 17mm adjustable wrench
  • Adjustable wrench for the flat surfaces on the nozzle holders
  • Slotted combination wrench, 17mm (optional)
  • 10mm socket with extension
  • 13mm socket with extension, a good 8mm Allen key is useful for 5-cylinder engines
  • A torque wrench is beneficial
  • CleanCleaning cloths, for absorbing fuel
  • Cotton swabs
  • Roll of paper towels
  • Compressed air
  • Small container or bottle with 10% detergent / 90% water


The previous nozzle holder combinations can be equipped with new injectors and adjusted. You can find information here about which nozzles have which properties.

The nozzle holder combinations are easiest to remove from the warm engine. First, the cylinder head cover (plastic cover) must be removed. Before proceeding with the work, the engine should be reasonably clean. If it is not, carefully clean the cylinder head, for example, by using an engine cleaning service. When working on the fuel injection system, it is absolutely essential to pay attention to cleanliness!

Warning! Please do not fill the engine and all electrical connectors with water using a pressure washer! If you do, please use low pressure and never spray directly onto the connectors. Clean the cylinder head around the nozzle holders with compressed air.

Extension:

Then, place cleaning cloths under the fuel injection pump lines, as fuel will leak out when the screws are loosened.

Prepare a clean surface using the paper towels.

Zylinderkopf und Einspritzpumpe

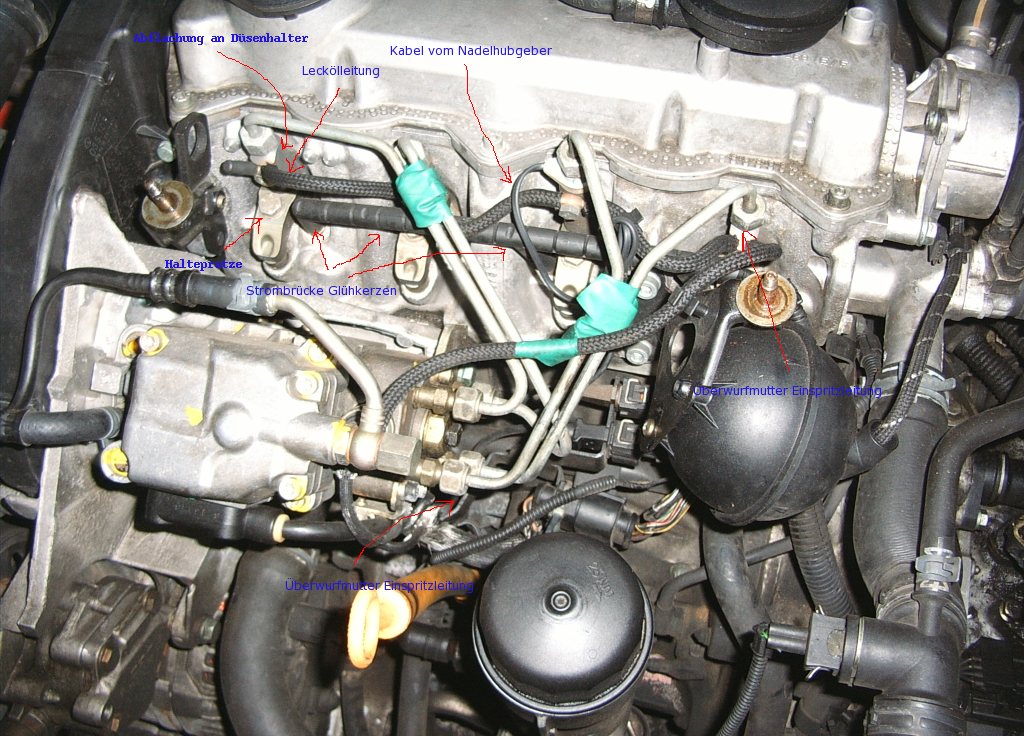
Loosen the locking nuts on the injector nozzles and remove the injector lines. Place the injector lines on the clean paper towel.
Detach the leak-off lines from the nozzle holders on each side. Don't forget to disconnect the connector of the needle lift sensor by pressing the wire clip at the back and pulling it simultaneously.

Now that access to the nozzle holders is clear, the power bridge for the glow plugs can be removed, and the screws on the retaining claws of the nozzle holder combinations can be loosened.

The nozzle holder combinations can be loosened and simultaneously removed from the cylinder head by carefully rotating them back and forth with a wrench (preferably an adjustable wrench) at the flattened section, after the retaining clips have been removed.
If the injector holders are stuck in the cylinder head, simply slightly loosen the retaining clips and take a short drive. Check repeatedly to see if the injector is loose before heat damage occurs due to the faulty seal. Do not loosen the retaining clips too much, as this will put too much stress on the injection lines.
Caution: Never turn the injector holders several rotations counterclockwise, as there is a risk that the threaded connection of the injector holder itself will come loose. The consequence is that you will have the rear part of the injector holder in your hand, while the rest with the injector remains stuck in the cylinder head, and the internal components of the injector holder fall into the engine compartment!

Place the nozzle holder combinations on the clean paper towel. If the nozzle holder combinations need to be transported, wrap them securely in clean paper towels. Also, cover the openings in the cylinder head to prevent dirt from entering.

Nozzle Tip Replacement:If completely new nozzle holder assemblies are installed, this point is not applicable. However, if only the nozzle tips are replaced (using nozzle repair kits), the nozzle holder assembly with the nozzle tip is clamped
from above

in a vise, and the union nut is opened with a 15 mm wrench. Caution: If the nozzle tip is carbonized with the union nut, loosen them with light hammer blows while continuing to unscrew them. If this is not done, the guide pins inside may break, and the nozzle holder will be scrap.Extreme cleanliness must be observed during the work! After installing the new nozzle tips, the nozzle opening pressure must be checked and, if necessary, adjusted. At a minimum, the idle speed control must be checked using VCDS in measurement block 13 of the engine control unit! You can
purchase VCDS here
.

Installation of the nozzle holder combinations:

Clean the openings for the nozzle holder combinations in the cylinder head using cotton swabs and oily paper towels. The sealing surface must be absolutely clean; it
must not be scratched with a screwdriver or similar tools!


Two straws that can be inserted into each other are also helpful, as they can be used to blow dirt out of the openings.

Then, attach the new copper sealing rings to the injector nozzles so that the rounded side of the sealing ring faces the cylinder head, and push the entire nozzle holder assembly back into the cylinder head.
Using the retaining clamps, tighten the screws easily. Rotate the nozzle holder combination so that it is straight and not twisted to the left or right. Tighten the retaining clamps with 20 Nm. Now, the rest can be reassembled in the reverse order, but only loosely attach the injector lines to the nozzles and the fuel injection pump.

When tightening the fuel injection lines, make sure that the lines are not twisted or strained! This will eventually lead to the lines breaking!


Have an assistant crank the engine using the starter until diesel fuel emerges from the connections between the injector lines and the injector holder assembly.Caution: Use rags to protect yourself and the engine compartment from fuel spraying out. Now, the injector lines can be tightened, and the engine can be started. The engine will initially run unevenly until all the air is bled from the injector lines. If the engine does not start, bleed the lines again.

With the engine running, check everything for leaks. Apply a few drops of oil (or a 10% detergent / 90% water mixture) to the gap between the injector holder assembly and the cylinder head. Bubbles indicate leaks. Carefully tighten the mounting screws. Leaks can cause the injectors to overheat and can damage the injectors and the cylinder head, so please work carefully.

Now, a short test run should be performed, and then everything should be checked again for leaks and secure fit. If a nozzle holder combination in the cylinder head is not sealing properly, it should be removed again, the sealing surface should be cleaned, and a new copper sealing ring should be used.

For more details on how to replace the nozzle itself and adjust the opening pressures, please see here:

https://community.dieselschrauber.org/en/viewtopic.php?t=26850


Translated on 19-09-2026, 5:03.
Back to top

Ratings - TDI Injector Replacement: DIY Guide & Tips

Average rating: 4.30 - worst rating: 1 - best rating: 5 - number of ratings: 10 - View ratings

You are not authorized to rate this topic. Danke sagen
🔗 🖨 Dieselschrauber - Index » Troubleshooting & Guides
Similar articles and topics
Topic Forum
No new posts Einstellung der Einspritzdüsen/Düsenhalter eines VP-TDI Troubleshooting & Guides
No new posts Replacing the climate control actuator motors in an Audi ... Troubleshooting & Guides
No new posts Repair of a VP37 manifold Troubleshooting & Guides
No new posts 2.5 TDI V6 AFB Injector Holder Adjustment Screws or Alter... Diesel Engine Technology
No new posts FYI: A 003-007-008-log from a 1Z Diesel Engine Technology
No new posts AHF Installation VW T3: Guide & Tips Diesel Engine Technology
No new posts Dashboard Upgrade: Installation & Retrofit Diesel Engine Technology
Jump to:  
You cannot post new topics in this forum.