| Author |
Message |
Jan6K
Joined: 04/12/2002
Posts: 4741
Karma: +107 / -0 
Location: Hagen
Premium Support
|
 19-10-2003, 14:58 Subject: 19-10-2003, 14:58 Subject: |
Quote |
|
Hi,
I bought the Waeco unit from Conrad for 99 euros. In addition to that, I spent about 1 euro more on decent 2.5 sq mm cable, around 2 euros for the switches, and roughly the same amount for the LEDs.
"In my opinion, the original controls in newer VAG cars are more than just a potentiometer or a switch – scroll up this thread a bit on page 1, and you'll find more information about that."
An adjustment should actually be possible, but you could also repurpose other switches or blank plugs. These small 19x13mm switches can actually fit in almost anywhere.
Best regards,
Jan.
1Z5 CFHF  / AHB H4D 
Translated on 19-07-2026, 23:57.
|
|
| Back to top |
Profile PM |
 |
dieselschrauber
Administrator

Joined: 04/12/2002
Posts: 18095
Karma: +799 / -0
Location: St.Gallen
2018 Volkswagen T6 
|
| 20-10-2003, 8:28 Subject: |
Quote |
|
Hello Jan,
Great instructions!
With your permission, I would like to include your report in the collection of expert articles.
Best regards, Rainer.
Translated on 19-07-2026, 23:59.
|
|
| Back to top |
Profile PM WWW Garage |
|
Jan6K
Joined: 04/12/2002
Posts: 4741
Karma: +107 / -0
Location: Hagen
Premium Support
|
| 20-10-2003, 11:03 Subject: |
Quote |
|
Hi Rainer,
Of course, I agree. You are welcome to copy and/or modify the design if that makes it easier for you to integrate it. And if you like, I can also send you the images in 1024x768 resolution – I didn't do that before due to space limitations.
Best regards,
Jan.
1Z5 CFHF / AHB H4D
Translated on 19-07-2026, 23:59.
|
|
| Back to top |
Profile PM |
|
manuu
Guest
Free account, no CAN development support
|
| 07-11-2003, 1:59 Subject: |
Quote |
|
Hi everyone. I'm new here and already have a question about this topic.
Ich hab auch vor eine Magic Heat nachzurüsten, bin aber nicht bereit meinen Wagen mit einem Waeco Schalter zu verschandeln, so dacht ich mir, dass es doch möglich sein müsste, einen orginalen Schalter weiter zu verwenden. Nun, um das orginale Steuergerät zu ersetzten bietet sich ja eine Drehzahlsteller an ( siehe zum Beispiel Conrad 196 460 - 14 oder 192 287 - 14 ), mit welchem man dann stufenlos die an den Heizkissen anliegende Spannung regulieren könnte. ( Potentiomenter auf dem Drehzahlsteller wird dann quasi durch den des orginalen Schalters ersetzt ). Nun ist aber die Frage, welchen der beiden Heizkreise ( blöde bezeichung ) man nutz, oder ob man, wie schon erwähnt beide parallel betreibt. WIs that possible, or would it get too hot (causing damage to the seat and heater)?Since these would have to be operated in parallel, they would generate quite high electrical currents and heat output.
If you say that level two is hot enough, then of course you could just use level two, and in that case, a speed controller with 5 amps would definitely be sufficient.
What do you think about it?
Thank you all.
Translated on 20-07-2026, 0:01.
|
|
| Back to top |
|
|
Jan6K
Joined: 04/12/2002
Posts: 4741
Karma: +107 / -0
Location: Hagen
Premium Support
|
| 07-11-2003, 15:47 Subject: |
Quote |
|
Hi,
I would only choose the second setting. It provides 45 watts per seat, which is enough. It does take a few minutes to really feel the warmth, but it gets hot enough that you'll likely want to turn it down or off after a while.
Therefore, I think that putting them together would be quite excessive, and I'm especially not sure if the seats would be able to withstand it, particularly the foam cushion and the upholstery.
Regarding the switch, internal schematics have already been published elsewhere.
Based on my experience, the two levels offered by Waeco are perfectly sufficient, and you can always create something useful from a simple blind plug (see my pictures).
Best regards,
Jan.
1Z5 CFHF / AHB H4D
Translated on 20-07-2026, 0:02.
|
|
| Back to top |
Profile PM |
|
Helmut
Guest
Free account, no CAN development support
|
| 09-11-2003, 21:27 Subject: Replace seat heater |
Quote |
|
Hello fellow mechanics,
hab' heute die Heizmatte der Fahrer-Sitzfläche am Golf IV (Sportsitze) gewechselt. Ging wirklich leicht; Bildergalerie von Jan6k war grosse Hilfe. Thank you very much!
The workshop estimated it would take 1.5 hours, but I managed to do it in the same amount of time.
Helmut.
Translated on 20-07-2026, 0:04.
|
|
| Back to top |
|
|
Jan6K
Joined: 04/12/2002
Posts: 4741
Karma: +107 / -0
Location: Hagen
Premium Support
|
| 09-11-2003, 22:18 Subject: |
Quote |
|
Hi Helmut,
Thank you for the feedback!
What might be generally interesting is whether the "internal structure" of the sports seats differs from what I photographed, or if it's essentially the same, just with a different level of firmness.
Best regards,
Jan.
1Z5 CFHF / AHB H4D
Translated on 20-07-2026, 0:05.
|
|
| Back to top |
Profile PM |
|
DocSnydor
Guest
Free account, no CAN development support
|
| 09-11-2003, 22:39 Subject: |
Quote |
|
I did this with my GT 'sport' seats, and I have to say it was the same. Maybe removing the cover was a little more difficult because the bolsters (for side support) are higher...
Translated on 20-07-2026, 0:05.
|
|
| Back to top |
|
|
Helmut
Guest
Free account, no CAN development support
|
| 10-11-2003, 0:16 Subject: Heated seats |
Quote |
|
@ Jan6K:
The foam was pure white and had a fine, closed-cell structure. The adhesive strips didn't come off easily, so I simply split the old heating mat in the areas where the adhesive was located. The cushioning wires also looked slightly different, but your pictures helped me prepare well. It really gives you a mental boost to have that kind of preparation.
I wrapped the airbag connector in aluminum foil and made sure that the 'door side' of the backrest was always facing upwards. It was quite nerve-wracking, especially since the workshop wouldn't lend me the required adapter, and the master mechanic had some scary stories to tell.
Helmut.
Translated on 20-07-2026, 0:06.
|
|
| Back to top |
|
|
konfi
Guest
Free account, no CAN development support
|
| 05-01-2007, 18:26 Subject: |
Quote |
|
hello
I also want to install heated seats. In my car, the original wiring already runs underneath the seats. I have Recaro GTI seats. I'm currently trying to find the relays. It should work with the original relays and other pads, right? The VW pads are very expensive for my seats.
Unfortunately, the circuit diagrams are no longer available online. Does anyone still have them?
Volkswagen Golf 3 TDI, manufactured in 1996, but with wiring harnesses from the GTI Edition.
Translated on 20-07-2026, 0:08.
|
|
| Back to top |
|
|
Jan6K
Joined: 04/12/2002
Posts: 4741
Karma: +107 / -0
Location: Hagen
Premium Support
|
| 05-01-2007, 18:34 Subject: |
Quote |
|
Hi,
The material of the heating pad itself doesn't really matter. What's more interesting is the sensor technology: As far as I know, the original heating pads have a thermal resistor (PTC or NTC) that allows the control unit (which isn't just a relay!) to detect how warm the pad is and adjust accordingly.
The Waeco devices I installed only have simple bimetallic switches that disconnect the ground wire when a certain (fixed) temperature is exceeded, temporarily shutting off the heating to prevent the user from being overheated.
"Also, the 'design' is different: As far as I know, the original mats have ONE heating circuit that is controlled via PWM, while Waeco has two circuits with 22 and 45 watts for the two heating settings. It might be possible to achieve 67 watts by connecting them in parallel, but I didn't do that back then."
If I were to implement something like this again, I would probably use a parallel configuration and build my own PWM circuit that can be adjusted between 0% and 100% using a potentiometer. Or, alternatively, I could just include an NTC thermistor; in that case, it might be better to simply use the original control unit.
Best regards,
Jan.
1Z5 CFHF / AHB H4D
Translated on 20-07-2026, 0:10.
|
|
| Back to top |
Profile PM |
|
konfi
Guest
Free account, no CAN development support
|
| 05-01-2007, 19:31 Subject: |
Quote |
|
Are you talking about pulse-width modulation (PWM) right now?
If I have a control unit with all this extra stuff, is the relay under the seats then unnecessary? Or is the relay the control unit?
I have four wires coming to the underside of the seat: ground, ignition voltage, and two 12V lines (which are only active when the switch is set to at least position 1 out of 5; otherwise, they are 0V). The 12V remains even when I turn the switch up to position 5. So, I assume that the current is being regulated. We have a 45W/12V device (approximately 4A) and a 25W/12V device (approximately 2A). Therefore, 12V/2A corresponds to 6 ohms, and 12V/4A corresponds to 3 ohms. To achieve this, I need to limit the range of my control so that level 1 corresponds to 6 ohms, levels 2-5 correspond to 5.25 ohms, 4.5 ohms, 3.75 ohms, and level 5 corresponds to 3 ohms.
The switch itself on the dashboard probably doesn't have much electronics connected to it, if I saw correctly, so everything is likely located in the control unit behind it, right?
You could potentially add a PTC or NTC sensor.
| Description: |
|
| File size: |
16.73 KB |
| Viewed: |
1898 times |
|
Translated on 20-07-2026, 0:13.
|
|
| Back to top |
|
|
Jan6K
Joined: 04/12/2002
Posts: 4741
Karma: +107 / -0
Location: Hagen
Premium Support
|
| 05-01-2007, 20:20 Subject: |
Quote |
|
Hi,
PWM stands for Pulse Width Modulation. It's a great way to control something like a seat heater. The highest setting means it's always on, 0 means it's completely off, and the middle setting could be set to turn on for 20 seconds and then off for 20 seconds, etc.
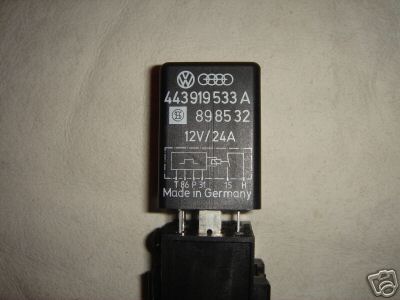
I believe the device in the picture uses a PWM (Pulse Width Modulation) control system combined with a relay – at least, that's what the labeling suggests.
"Most likely, the potentiometer (or possibly a switch with corresponding resistors) located in the dashboard is normally connected to this device in such a way that it allows you to adjust the stroke ratio. You're always seeing 12 volts because you're measuring without load, but that doesn't really matter because the potentiometer is likely very high resistance."
Deine Idee mit den Widerstaenden vergiss mal ganz schnell: Ueberleg mal, wieviel Waerme an denen abfallen wuerde! Zudem stimmt die Rechnung nicht, da eine Heizmatte einen (halbwegs) konstanten Widerstand hat. Du regelst also Spannung UND Strom. Um eine 45 W Matte mit 22,5 Watt zu betreiben, musst du sie mit 12V / sqrt(2) betreiben., also rund 8,5 Volt bei 2,6 A. Am Vorwiderstand fallen dann 3,5 Volt und damit knapp 10 Watt ab - das wird bangig warm! Therefore, using PWM is definitely a good idea.
Since you have a switch and control unit (like the one in the photo), you basically just need to figure out what it requires from the heating mat side. In principle, there should be three connections for ground, power, and a sensor. You also need to determine exactly which type of sensor is required.
Do you happen to have a repair manual or something like that for the car? The wiring diagrams might show it – at least enough to understand what it is. Or maybe measure it on a car with factory-installed floor mats.
Best regards,
Jan.
1Z5 CFHF / AHB H4D
Translated on 20-07-2026, 0:16.
|
|
| Back to top |
Profile PM |
|
|


 Bookmarks
 Links
Links Garage
 FAQ, Legal Notice & Privacy
 RSS Feed
 Register
 Login
Login

