| Author |
Message |
highbeta
Guest
Free account, no CAN development support
|
 01-04-2007, 18:32 Subject: Damaged Threaded Bushing: Repair on Engine Mount? |
Quote |
|
Hello,
'While replacing the stabilizer bar bushings, I damaged the threads on the engine mounting bracket. Even when unscrewing it, the threads on the screw for the left stabilizer bar bushing clamp looked bad. The right side was fine.'
After the usual fiddling with a longer screw and pre-tensioning, the screw can no longer be tightened properly. The thread is stripped.
As far as I can see, the effort required to remove the power unit carrier is manageable. You need to unscrew the tie rods, the 4 screws on the body, and the 4 screws on the steering gear. Of course, the stretch bolts will be replaced.
Has anyone here ever repaired threads using inserts (like Helicoil or similar)? I believe a properly installed threaded insert is more durable than those VW rubber-metal threads. I could drill it out cleanly using a milling machine.
I'm just not sure what the threaded part looks like, whether anything is pressed in, and whether there's enough material left for a repair. I would appreciate any information you can provide.
Does anyone know how much a new generator carrier costs?
Thank you and best regards.
DirkP
-----------------------------
Volkswagen Golf IV, 74kW (AXR engine), manufactured in 2002.
Translated on 11-10-2026, 3:09.
|
|
| Back to top |
|
 |
BM
Profi-Schrauber


Joined: 12/07/2005
Posts: 1857
Karma: +8 / -0 
Location: Nähe Düsseldorf
Premium Support
|
| 01-04-2007, 20:00 Subject: Damaged Threaded Bushing: Repair on Engine Mount? |
Quote |
|
Quote: | | I'm just not sure what the threaded part looks like, whether anything is pressed in, and whether there's enough material left for a repair, and I would appreciate any advice. |
Hmm, I'm not 100% sure. In any case, the other threads (e.g., for attaching the control arms) consist of relatively thin threaded bushings that are attached by press welding. In your case, M8 threaded nuts might also be a possibility.
I consider drilling in both cases to be questionable, or even impossible.
If it were my car, I would remove and replace the thread before paying around 280 EUR for it. 3B5 AJM
Wer nichts weiss, muss alles glauben.
**Technische Fragen bitte ins Forum und nicht in mein Postfach**
LG, Onkel BM
Translated on 11-10-2026, 3:12.
|
|
| Back to top |
Profile PM |
|
highbeta
Guest
Free account, no CAN development support
|
| 01-04-2007, 21:10 Subject: Damaged Threaded Bushing: Repair on Engine Mount? |
Quote |
|
Can you access the weld nuts when you remove the entire engine carrier? The front hex bolt (1  , M14x1.5x95, which secures the engine carrier to the body, is located in a support sleeve. Can this sleeve be removed, or is it fixed? If it can be removed, there's a chance to access the area; otherwise, it's impossible to weld from the back. Unfortunately, this isn't clear from my repair manual. The sleeve is shown in the overall view, but it's missing in a detailed drawing, which is frustrating!
Perhaps drilling and inserting threaded inserts would also be a solution. However, this would place the flange on the wrong side, which would affect the tension of the rubber rod.
What a jerk!
'Thank you anyway.'
DirkP
Translated on 11-10-2026, 3:14.
|
|
| Back to top |
|
|
BM
Profi-Schrauber
Joined: 12/07/2005
Posts: 1857
Karma: +8 / -0
Location: Nähe Düsseldorf
Premium Support
|
| 01-04-2007, 21:45 Subject: Damaged Threaded Bushing: Repair on Engine Mount? |
Quote |
|
Quote: | | If it were removable, there would be a chance, otherwise, you can't reach the area to weld from the back. |
If it can't be done from the back, then do it from the front. Create a piece of round steel with threads, drill out the old threads accordingly, bevel both parts, and weld them together flush and at an angle on the outside. Realign and weld again, possibly in several stages, to prevent the material from overheating. Then, grind it smooth and don't forget the corrosion protection (including from the inside). 3B5 AJM
Wer nichts weiss, muss alles glauben.
**Technische Fragen bitte ins Forum und nicht in mein Postfach**
LG, Onkel BM
Translated on 11-10-2026, 3:15.
|
|
| Back to top |
Profile PM |
|
highbeta
Guest
Free account, no CAN development support
|
| 02-04-2007, 8:37 Subject: Damaged Threaded Bushing: Repair on Engine Mount? |
Quote |
|
Yes, that could work. I can machine a threaded bushing like that.
By the way, I've already read about the metal nuts on the control arms. Apparently, you're not supposed to repair them if the threads are damaged. If they have to include that in their instructions, why do they manufacture such a piece of junk in the first place?!
Therefore, I will be particularly careful during the assembly.
Thank you again.
Regards,
DirkP
Translated on 11-10-2026, 3:17.
|
|
| Back to top |
|
|
highbeta
Guest
Free account, no CAN development support
|
| 15-04-2007, 17:17 Subject: Thread Repair on Engine Mount: Success! |
Quote |
|
Hello,
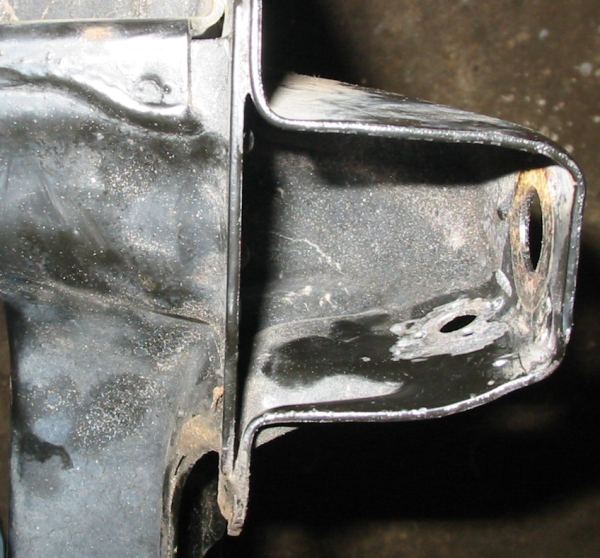
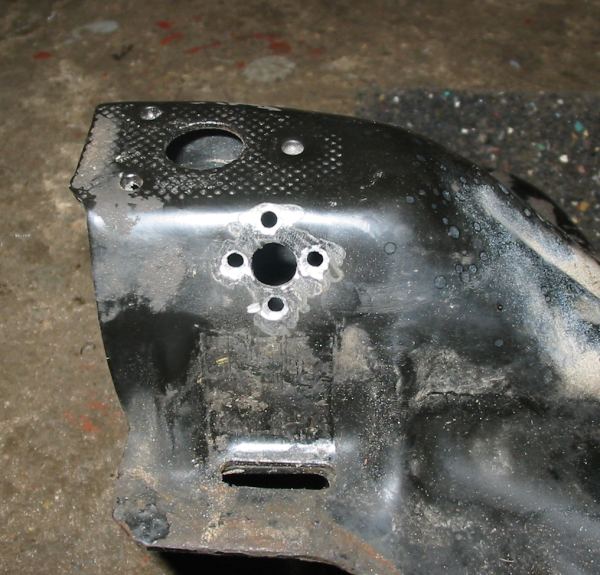
The thread repair worked. As suspected, the engine carrier can be removed relatively easily. To remove the damaged threaded parts, I had to carefully extract the support sleeve from the engine carrier. Using a Dremel, you only need to grind off the three front pressing points, and then the sleeve can be pulled out. The damaged threaded parts can be easily pried out with a chisel or a sturdy screwdriver, as they are only spot-welded in place.
As a replacement, I turned two M8 threaded bushings, approximately 10mm long, from 18mm round stock. To weld them in, I drilled four additional 4mm holes around the existing hole and countersunk them. From the top, the new sleeve can now be easily positioned for welding. For extra security, I also welded them slightly from the back. Now, the support sleeve needs to be reinstalled and also lightly tack welded in place.
Here's another tip to avoid this repair. When replacing the stabilizer bar bushings, you must pay very close attention to cleanliness. Dirt can easily accumulate in the bore, which you can then inadvertently introduce into the threads. You might want to blow it out with compressed air or use brake cleaner (of course, being careful not to let it come into contact with the rubber parts). The new clamps that you should replace during the bushing change are not perfectly round in the screw bore. You should use a flat file to slightly round the bottom edge of the bore. Otherwise, it will be very difficult to properly seat the screw. The new screws have a slightly angled tip (I suspect this helps to push any dirt aside). If you insert the screw at an angle and then tighten it, the threads of the screw will be damaged. In that case, it's best to have a spare screw on hand. Otherwise, you risk damaging the rest of the threads and will have to start all over again  .
Regards,
DirkP
| Description: |
| Damaged Threaded Bushing: Repair on Engine Mount? |
|
| File size: |
66.47 KB |
| Viewed: |
2572 times |
|
| Description: |
| Damaged Threaded Bushing: Repair on Engine Mount? |
|
| File size: |
72.9 KB |
| Viewed: |
2973 times |
|
Translated on 11-10-2026, 3:19.
|
|
| Back to top |
|
|
BM
Profi-Schrauber
Joined: 12/07/2005
Posts: 1857
Karma: +8 / -0
Location: Nähe Düsseldorf
Premium Support
|
| 15-04-2007, 20:45 Subject: Damaged Threaded Bushing: Repair on Engine Mount? |
Quote |
|
Quote: | | The thread repair worked | .
"Looks good. I thought that profile was closed, which is why I suggested replacing the thread from the outside. Of course, this is even better, and the structural integrity isn't compromised either."
Quote: | | Here, you should use the round file to slightly help shape the bottom. Otherwise, it will be very difficult to properly engage the screw. The new screws have a beveled edge at the front (I suspect that dirt tends to be pushed aside). If you insert the screw at an angle and then screw it in, the threads of the screw will be damaged. |
To avoid this, it's generally recommended to adjust the first 5 gears manually using your fingers. The shims can be easily positioned in the correct alignment using a lever or similar tool to prevent the screw from getting stuck. 3B5 AJM
Wer nichts weiss, muss alles glauben.
**Technische Fragen bitte ins Forum und nicht in mein Postfach**
LG, Onkel BM
Translated on 11-10-2026, 3:22.
|
|
| Back to top |
Profile PM |
|
|


 Bookmarks
 Links
 Garage
 FAQ, Legal Notice & Privacy
 RSS Feed
 Register
 Login

